Receive our product catalogue free of charge!
Please click the button to order our free product catalogue.
The Veloped has a unique 3-wheel design, but as you can see it has in fact four wheels. It’s aimed to be used as a walking aid, especially for people with the desire to be physically active outdoors. Developed with a focus on walking and facilitating access for the user, the Veloped is one of a kind. Its main characteristic is a dual front wheel with the capacity to overcome obstacles up to 15 cm high (14" wheels). The force required to overcome a smaller obstacle is also greatly reduced, when compared to a traditional wheel.
The Veloped is tested and approved according to the international standard ISO-11199-2:2005, for a maximum user weight of 150 kg.
| 12er M | 12er L | 14er M | 14er M | |
|---|---|---|---|---|
| Min. height: | 75 cm | 82 cm | 77 cm | 84 cm |
| Max. height: | 95 cm | 102 cm | 97 cm | 104 cm |
| Width: | 76 cm | 79 cm | 76 cm | 79 cm |
| Length: | 102 cm | 102 cm | 107 cm | 107 cm |
| Seat height: | 58 cm | 63 cm | 60 cm | 65 cm |
| Seat width: | 44 cm | 44 cm | 44 cm | 44 cm |
| Wheel size: | 12"/31 cm | 12"/31 cm | 14"/36 cm | 14"/36 cm |
| Size folded H x L x W: | L106xW42xH75 cm | L106xW42xH82 cm | L111xW42xH77 cm | L111xW42xH84 cm |
| Size folded without wheels H x L x W: | L84xW42xH59 cm | L84xW42xH68 cm | L84xW42xH59 cm | L84xW42xH68 cm |
| Weight (Sport): | 11,4 kg | 12,0 kg | 11,9 kg | 12,5 kg |
| Weight without wheels: | 7,7 kg | 8,3 kg | 7,7 kg | 8,3 kg |
| Max. user weight: | 150 kg | 150 kg | 150 kg | 150 kg |

Many rollator users set the grips too high, thinking that it will promote a more upright posture. But this actually worsens the posture, and it affects the stability negatively.
You can determine the correct Veloped grip height by doing as follows, as recommended by all physiotherapists and all rollator manufacturers:
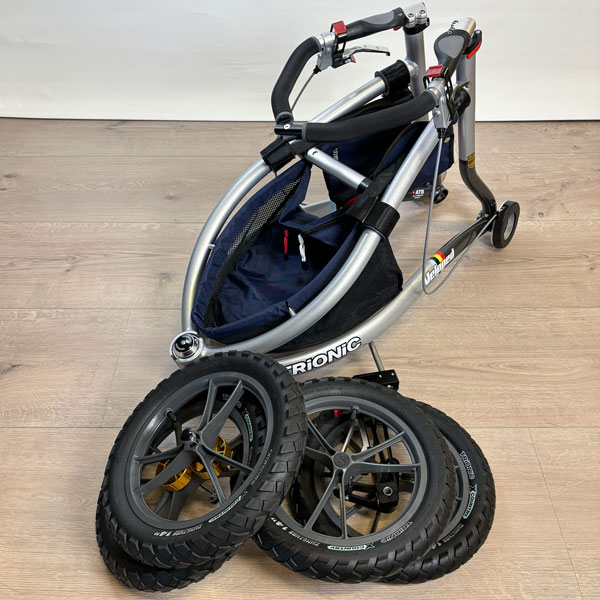
1. Attach the rear wheels to the frame’s rear axle holes by pressing the black button in the centre of the wheel and then pushing the axle all the way into the axle hole. Release the push button.

2. Check that the wheels are properly attached by pulling/pushing them sideways.

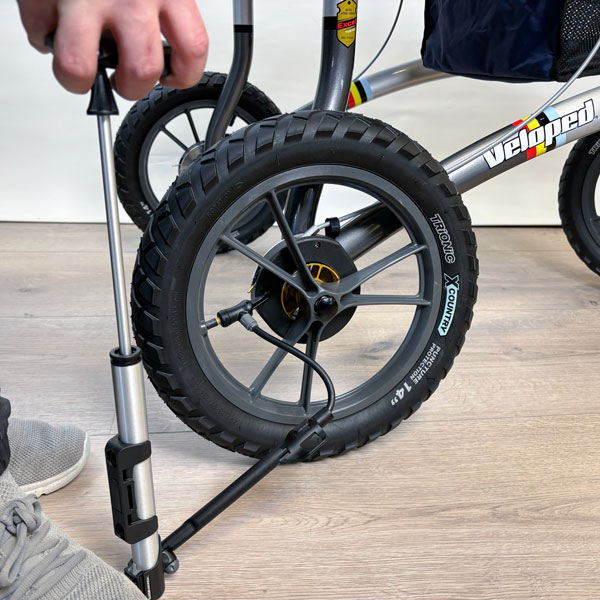
3. Attach the front wheel suspension to the front bottom end of the frame in the same manner, i.e. press the black button at the bottom of the axle and press the axle into the axel hole from underneath. Release the push button.
4. Check that the front wheel is securely fastened by lifting the frame from the surface and pulling the front wheel downwards.
5. Open the quick-release levers and adjust the grip height as described in the chapter “Correct Grip Height”.
Unfold the Veloped by pulling the gripbar handles sideways, away from each other.
Check that the Veloped locks in walking mode; when unfolding it make sure you hear a click from the telescopic stay locking into position.
The seat can be slid forward and rearward. Push it forward to obtain maximum walking space.
Before using the seat, reaching the basket or folding the Veloped, pull the seat rearwards.
Pull the seat to the rear.

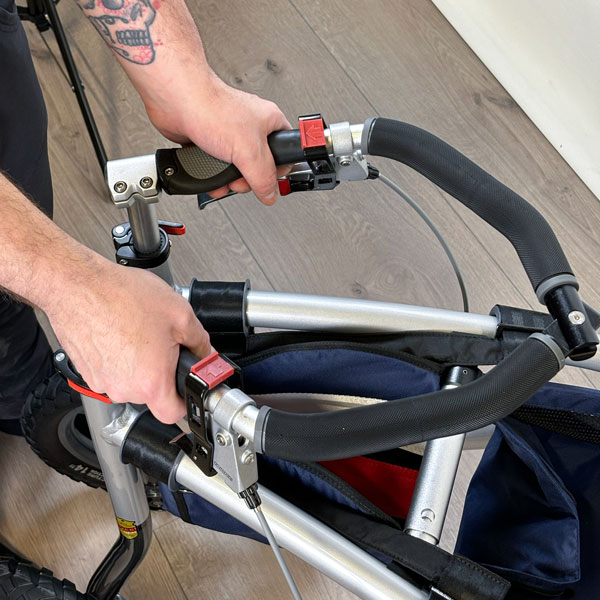
Press the button on the right of the telescopic stay.
While holding the button pushed, lift the right or the left hand grip a little and fold the frame halfways.

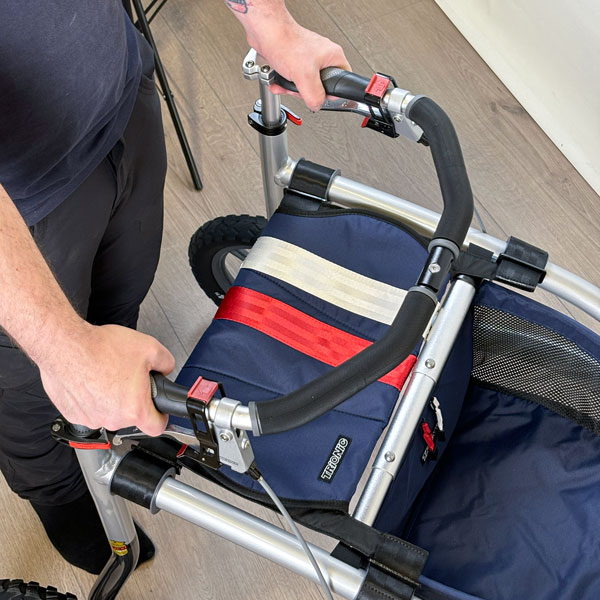
Press the other button on the left of the telescopic stay.

While holding the button pushed, lift the right or the left hand grip a little and fold the frame completely together.
You can engage the parking brake in 3 different ways.
Option 1: Push the lower red parking trigger downwards with your index finger, while you pull the brake lever at the same time. Make sure that the parking brake is engaged, and that the Veloped does not move.
Option 2: Pull the upper red parking trigger rearwards with your thumb, while you pull the brake lever at the same time. Make sure that the parking brake is engaged.
Option 3: Use both hands. Pull the upper red parking trigger rearwards with one hand, while you pull the brake lever with your other hand. Make sure that the parking brake is engaged.
To release the parking brake, brake in the same manner as for using the motion brake.
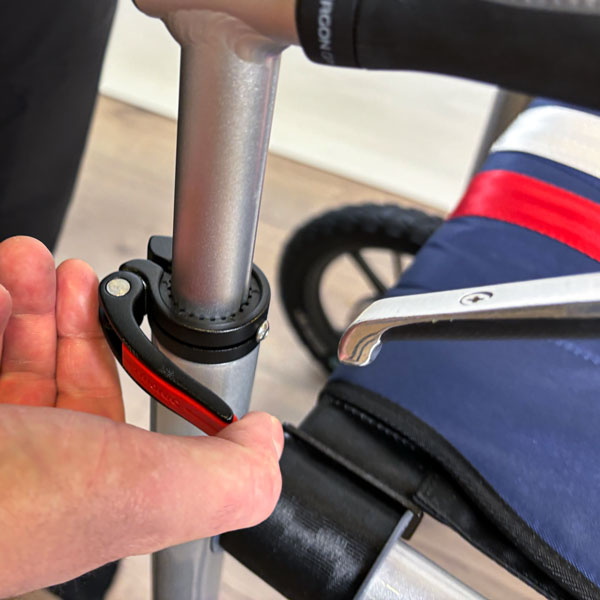
Release both quick-release levers by folding them outwards.
Adjust the grips to the suggested height, the most adequate being the vertical distance from the wrist to the ground when standing with the arms hanging freely. Use help to measure!
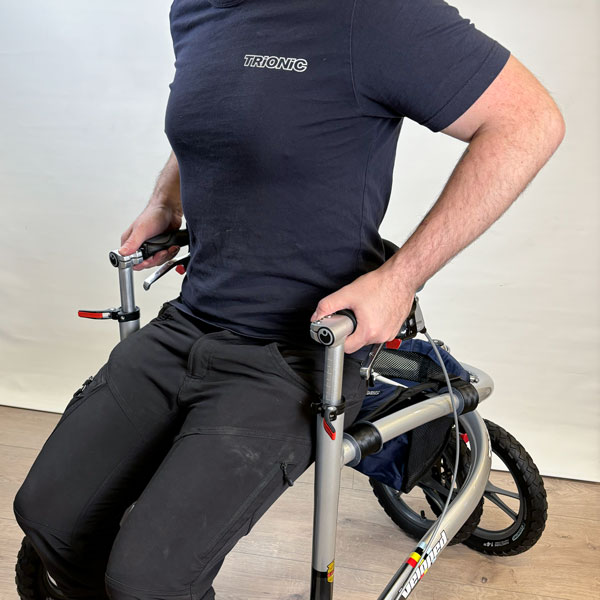
NOTE: The easiest way to adjust the gripbar is when sitting on the seat, this way you can see the height indication marks clearly, thus simplifying height adjustment.

Lock both quick-release levers by folding them inwards.

NOTE! Do not operate the quick-release levers like wing nuts or screws. The quick-release levers can be replaced with screws and nuts if there is a risk that the user accidentally releases the levers while using the Veloped.
The angle of the grips can be adjusted so that you get a comfortable hand position and an optimal support.

1. Loosen the screw on the rear end of the grip with a 4 mm Allen key.

2. Turn/rotate the grip to your chosen angle.
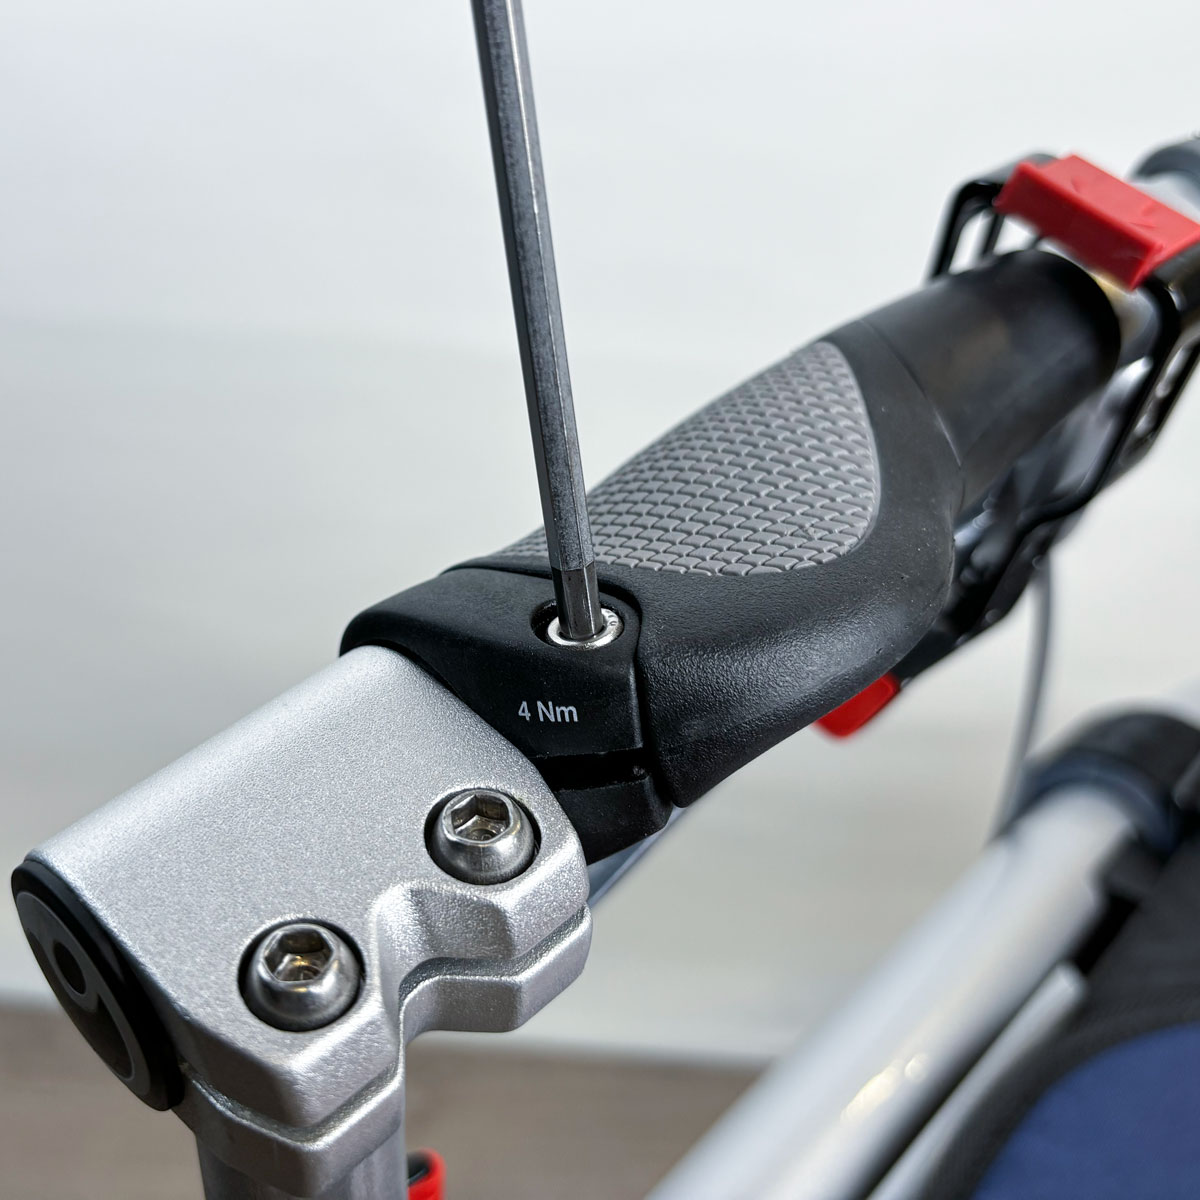
3. Tighten the screw on the rear end of the grip with a 4 mm allen key.
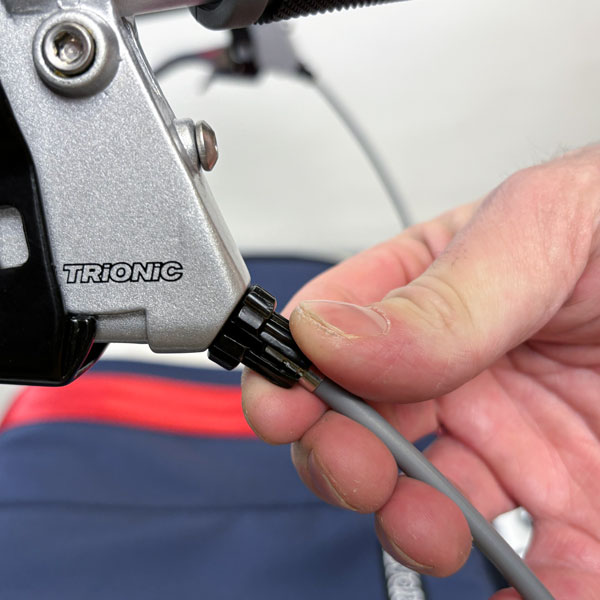
1. If the brakes work poorly, loosen the adjustment screw on each brake lever (counter-clockwise) and lock it in position by screwing the lock-nut towards the handle (clockwise).

Contact your retailer, or the person responsible for servicing your Trionic Veloped, if the brakes still work poorly.
The rear wheels are removable to simplify transportation of the Veloped.

To remove the wheel, press the black button at the centre of the wheel and pull the wheel off.

To attach the wheel, press the black button at the centre of the wheel and push the wheel axle into the axle hole. Release the button when the wheel is in its end position.
Hold the tyre and push/pull the wheel back and forth laterally to check if the wheel is properly secured.
The front wheel suspension is removable to simplify transportation of the Veloped.
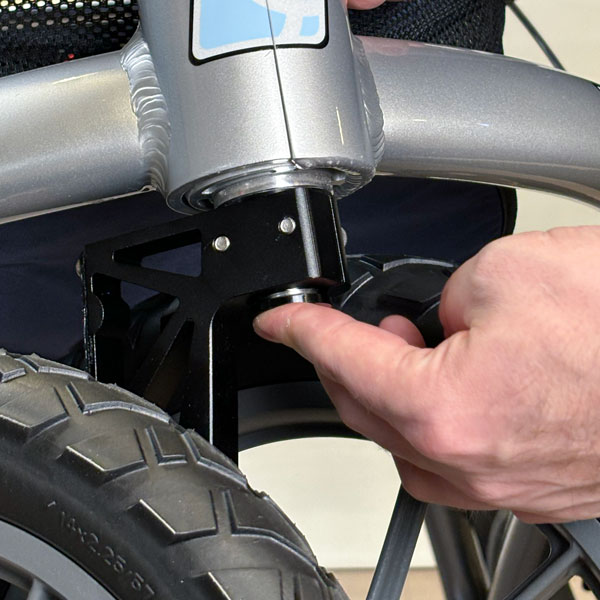
Press the black button under the front hinge to release the front wheel suspension.

To remove the entire wheel suspension, lift the front end of the frame while pulling the wheel suspension downwards.

To install the front wheel suspension, lift the front end of the frame, press the black button and push the wheel axle into the axle hole placed under the frame. Release the black push button.
The wheel has two different settings: one for easy steering and one for direction-steady mode. There is an adjustment handle on the front wheel, placed between the wheels, that can be shifted between these two settings.
Offers easy turning with retained climbing capacity.
Offers increased climbing capacity, suspension on uneven surfaces and a higher directional stability. The Veloped is more difficult to steer, but it performs better off-road.
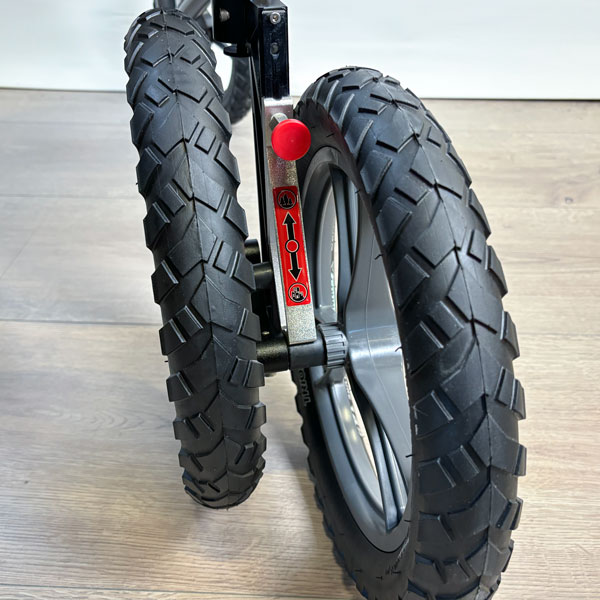
Turn the front wheel 180 degrees for easier access to the adjustment handle.

1.Grab the left wheel with your left hand and lift the Veloped front end slightly off the ground.
2. While holding the Veloped lifted with your left hand, grab the red knob with your right hand, and pull it outwards (towards you).
3. Slide the adjustor (right hand) either downwards or upwards. It is important that you slide the adjustor to its very bottom or upper end position.
4. Release the red knob, and it will spring back and lock the front wheel to your chosen setting.
The basket of the Trionic Veloped has a 22-litre loading capacity. It has a small zippered pocket at the rear end for valuables and smaller objects. The Veloped basket is removable, and is attached to the frame basket rails with three velcro sections.
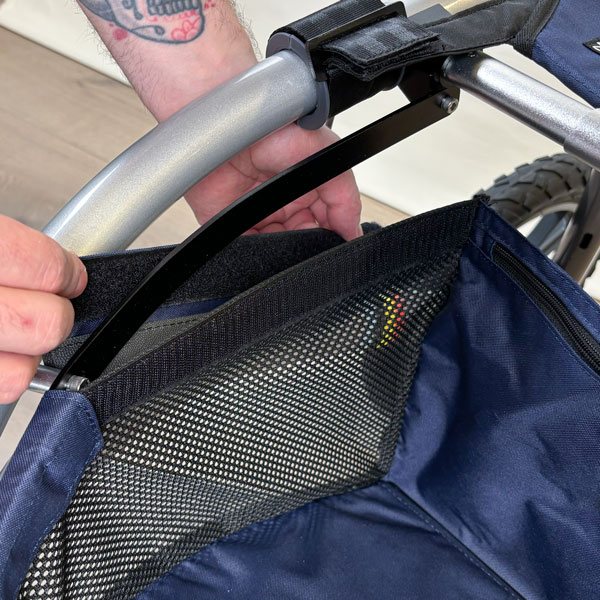
1. Wrap the rear velcro flaps around the rails from underneath, between the frame and the basket rail. Fold them inwards and fix the velcro sections on the inner of the basket lining.

2. Attach the front velcro flap in the same manner.
3. If necessary, adjust the velcro sections to ensure that the basket is properly fastened.
NOTE! Make sure to insert the plastic plate into the bottom sleeve of the basket before attaching the basket to the frame.
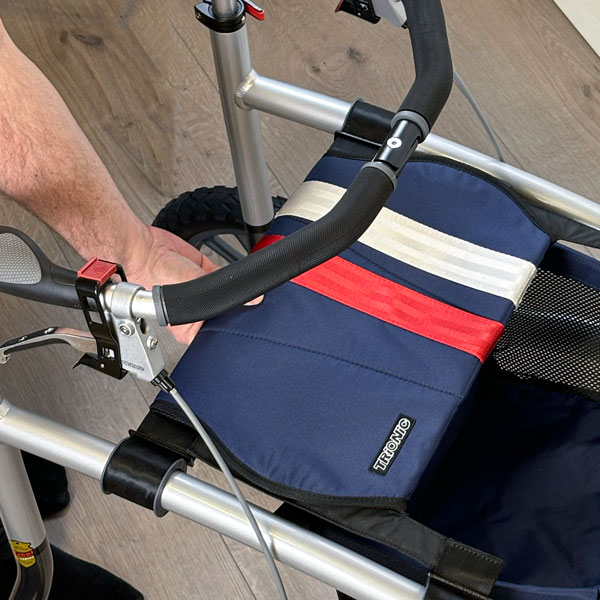
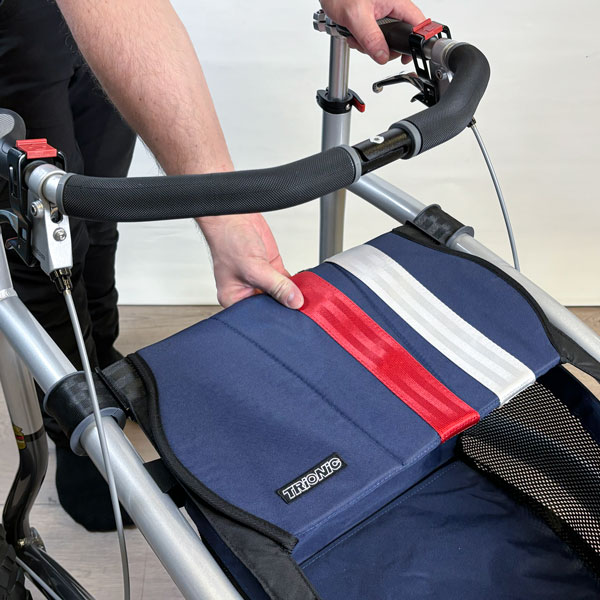
The Veloped’s sliding seat is comprised of a seat base and a removable cover fixed with nine push buttons.

1. Hold the seat cover with the text Trionic to the right. Wrap the long flap between the telescopic stay and the seat base.

2. Attach the three front push buttons of the long flap to the seat base.

3. Press the three push buttons on the short flap onto the seat base.

4. Finally, press the three last push buttons of the long flap onto the short flap.
Before use, check that your Trionic Veloped functions properly:
In order to maintain function and safety, make sure the following is carried out regularly:
Make sure to check the tyre pressure every 4–5 weeks. Trionic recommends a tyre pressure of 1.5 bar/22 psi.
Trionic does not take responsibility for any alterations (adjustments or inadequate repairs) done to the product without prior authorization.
 The Trionic Veloped includes a 10-year guarantee, excluding parts that are subject to normal wear (tyres, tubes, brake pads, brake cables, brake cable housings, grips and textile parts). The guarantee is valid from the date of purchase, and covers Trionic original parts only.
 CE – Trionic Sverige AB ensures that this Class I Medical Device meets the requirements of the EU regulation MDR 2017/745 and that it is certified to ISO 11199-2:2021.
The Veloped is tested and approved according to the international standard for rollators ISO 11199-2:2021 and it meets the requirements of the EU regulation for medical devices MDR 2017/745.
The user’s weight may not exceed 150 kg.

The Trionic Veloped is manufactured in the way to have as little negative impact on the environment as possible during its lifecycle. When the product has served its purpose, it can be scrapped and the parts can be recycled.

Trionic Sverige AB is a member of Repak Ltd Ireland and Valpak Limited in UK and fully implements the European Directive on Packaging and Packaging Waste dated December 20, 1994.
Walker - from Sweden…
The Veloped Sport M 14er arrived in Travermünde on the Baltic Sea in early March 2021.
It enriched my life. By this I mean that I can walk again. I am an 80-year-old woman, and I would have liked to still be active and always around.
Thanks to th…
Simply AMAZING…
I ordered it last weekend, and the Veloped arrived on Wednesday. It's very easy to assemble. And most importantly, it's a joy to ride over rough terrain. My husband and I immediately chose a challenging route: cobblestones, grass, fields, roots. No p…
I bought the Walker after the Veloped…
After careful consideration, I bought the Walker because I am no longer able to go off-road (I had the Trionic Veloped before).
I was already familiar with the tyres.
I have been using the Walker for several weeks now and I must say that I have bee…
Trekking Again!…
Bought the Veloped Trek. I have Charcot Marie Tooth Disease and have had increasing difficulty walking even with two hiking poles. Last week I was able to hike in the Beartooth Mountains and Yellowstone National Park for the first time in many years.…
The Veloped has become my faithful companion...…
The Veloped has become my faithful companion. I can only recommend it. My range of motion has increased fourfold, giving me a better life quality. Thanks to the team for such a design. I would like to see it distributed more in Germany as well.
My…
With a big thanks for the new found freedom...walking freely again.…
In the city, in shops, in the garden, in the forest with the whole family... free to walk and still go out easily. The pleasure of walking in the fresh snow.
Every week we go to bio coop and there are already a few strangers that asked us where we…
The Veloped was delivered quickly……
The Veloped was delivered quickly. I am very satisfied with the technology and equipment. It can be used very well in the intended areas in the city and its surroundings and offers the hoped-for relief and help. I am very satisfied with that. I arous…
I am very pleased with my Veloped.…
It has certainly attracted a lot of attention. It encourages me to was on a regular basis in a more upright position, without my arms aching as they did with my other rollator.…